Voice Communications
Upon connecting to VATSIM, the controller list will be displayed along the left side of the xPilot client window. Controllers will be grouped by facility type, and each entry in the list will show the controller’s callsign and frequency. Hovering over a callsign will trigger a popup label displaying the controller’s name.
To communicate with a controller, simply tune their frequency on your aircraft’s radio panel using either the COM1 or COM2 radio. Ensure that the radio is set to both transmit and receive modes. (You can also tune a frequency for receive only, which is useful when listening to the ATIS on the second COM radio.) The radio stack panel, located at the top left of the xPilot client window, displays the status of the radios. The TX/RX labels will appear white when transmit and receive modes are enabled for the respective COM radio.
In the provided example, COM1 is enabled for both transmit and receive, as indicated by the white TX/RX indicators, while COM2 has transmit and receive modes turned off.
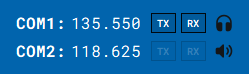
The “Speaker” and “Headset” icon allows you to toggle if the audio for the respective radio is routed through either the headset or speaker device, as configured in the xPilot audio settings.
To communicate with a controller using text radio messages, make sure you have the “Messages” tab selected. Then, type your message in the text command line located at the bottom of the message area and press Enter on your keyboard to send the message. xPilot will transmit the text message as a text radio message on the COM frequency that you have selected for transmit.
Incoming text radio messages will be displayed in the main messages area. If you are listening (receiving) on multiple COM radios, the text radio message will be prefixed with the frequency on which it was received.
If an incoming text radio message is specifically directed to you, your computer’s default audio device will play an alert sound, and the message will appear in a cyan (light blue) color. Text radio messages intended for other pilots or not directed to anyone in particular will appear in gray color.
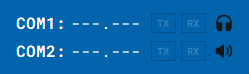
Note that your aircraft’s avionics must be powered on for the COM radios to function. If your avionics are not powered, the TX and RX indicators for both COM radios will appear grayed out, as shown in the screenshot below, and you will not be able to receive or transmit.
If you encounter issues with xPilot not properly synchronizing your radio transmit and receive status, you can manually force xPilot to transmit and/or receive on a specific radio.
To force xPilot to receive on a specific COM radio, you can use the
.rxdot command. For instance, if you want to receive on COM1, you can enter.rx com1 onin the command line and press Enter.To force xPilot to transmit on a specific COM radio, you can utilize the
.txdot command. For example, if you want to transmit on COM2, you can enter.tx com2in the command line and press Enter.For further information, refer to the Dot Commands section.